How buying works here, and everything needed to open and run a shop. Written for people who have never used an admin dashboard.
Sellers and administrators can also open this from their dashboard, under Account → Help.
Contents
Contents
Start here
How the marketplace works, and how everybody gets in and out of it.
How the marketplace works
Miamia is a marketplace: many independent shops, one storefront, one basket.
No money is taken online. A shopper places an order, then each seller telephones them to arrange payment and delivery. Cash changes hands on the doorstep.
A basket can hold items from several shops. When the order is placed it splits: each shop gets its own part and handles it alone. The shopper still sees one order number and one total.
The platform earns a commission on each part of an order that is actually delivered. Since no money passes through the site, that commission is collected from each seller separately.
Only a buyer whose order was delivered can review a product. That is what makes the star ratings worth reading.
The two sign-in pages
There are two sign-in pages, and they are not interchangeable.
Who
Where they sign in
What they get
Shoppers
The Sign in button at the top right of the shop
The shop, their orders, saved items
Sellers and administrators
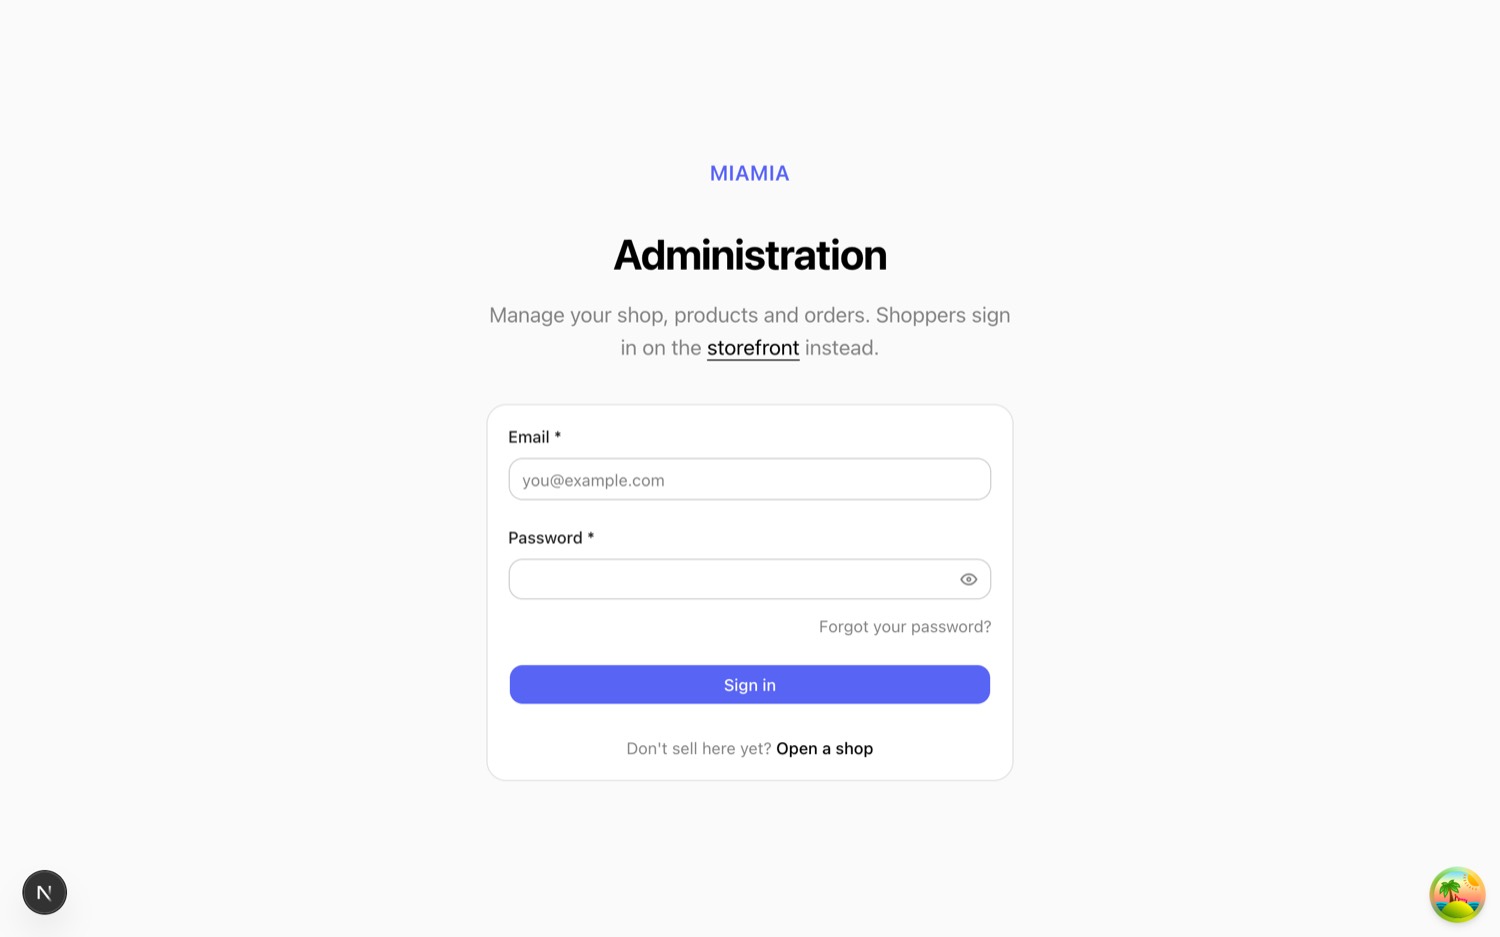
The page headed Administration
The management dashboard
It is one account either way — the same email and password. The difference is only where you land. A seller who signs in on the shop stays on the shop and can buy things like anyone else; they enter their dashboard when they choose to.
Someone who signs in at the Administration page without a right to be there is not simply refused. The page says why: “This area is for sellers” when they have no shop, or the shop’s name and its current state when the shop is not approved yet.
Plate 01The Administration sign-in page, showing the sign-in form and the link across to the storefront.Seen as: Signed out
Signing out
In the dashboard: click your name at the very bottom of the left menu, then Sign out. You return to the Administration sign-in page.
On the shop: click the round avatar at the top right, then Log out. You stay on the shop, still able to browse.
One session sits behind both doors, so signing out of either signs you out of both.
Creating accounts
There is no button for this
Administrators cannot sign themselves up. The “Create an account” link always makes an ordinary shopper account — there is no admin equivalent to look for.
The first administrator account is created directly by the development team, on request. After that an existing administrator can promote any registered person from the Users page, which is the normal way to add a colleague.
How a shopper registers
On the shop, click Sign in, then Create an account.
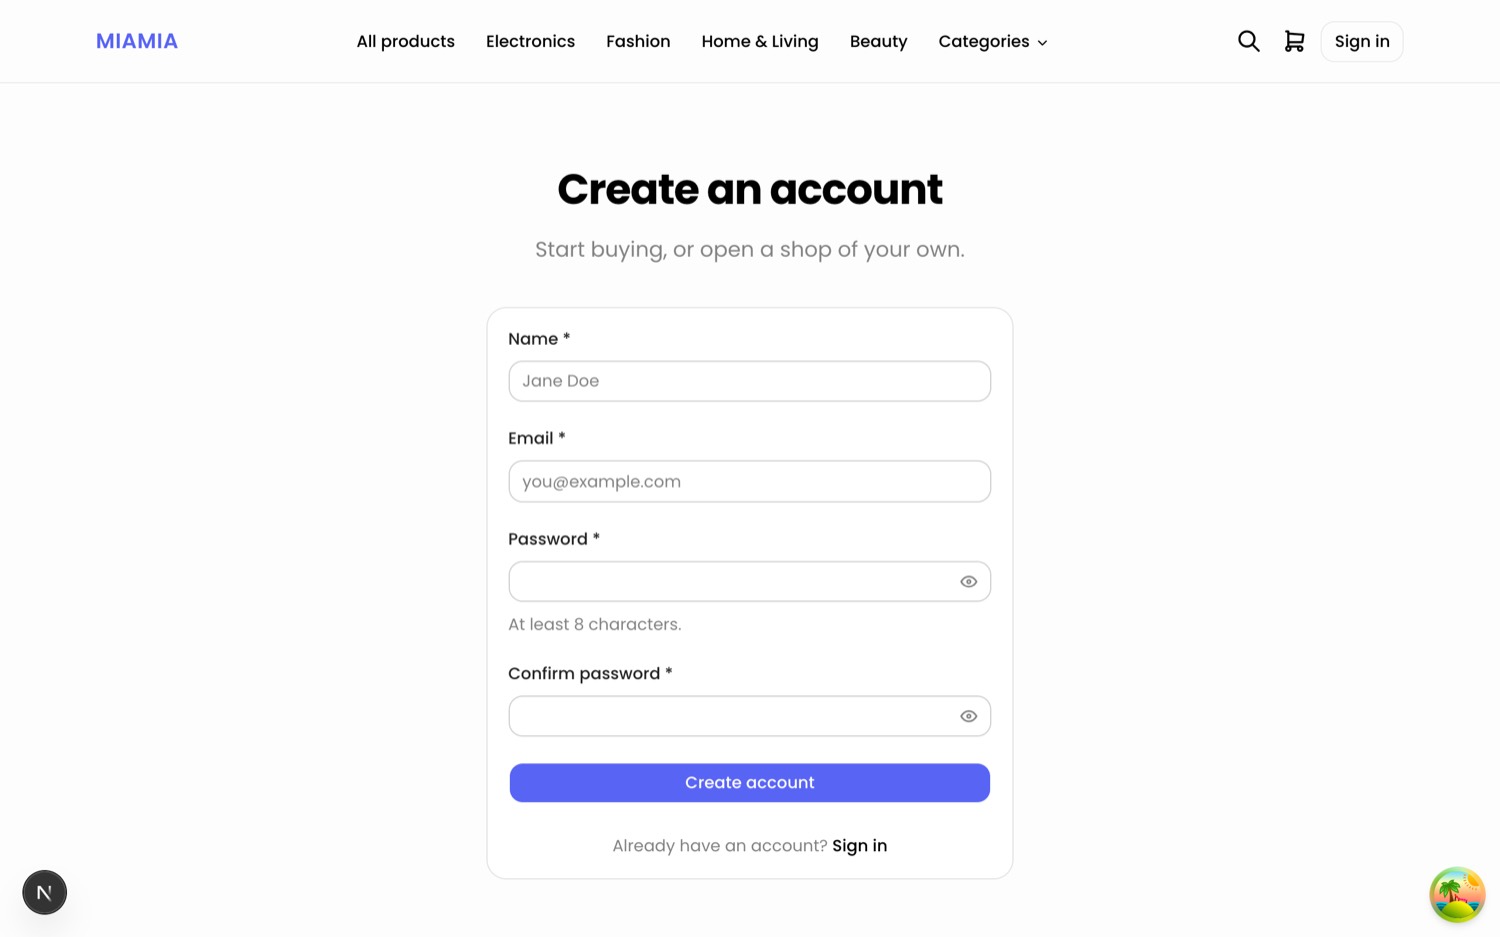
Fill in name, email, password, and confirm the password. Submit.
A confirmation email is sent, and the account does not work until its link is clicked. Signing in first shows “Confirm your email address before signing in”, with a Send a new link button beside it.
The link confirms the address, and sign-in works from then on.
Confirmation links work once and last 24 hours.
Plate 02The “Create an account” page, empty.Seen as: Signed out
How a seller comes to exist
A seller is always a shopper first.
A shopper registers and confirms their email.
They open Your account → Become a seller and fill in the application.
Every administrator is emailed “New seller application”.
An administrator approves the shop from Shops.
The applicant is emailed, and their dashboard opens.
Between the application and the decision they own a shop that exists but may not trade. They can sign in, see its status and upload documents. Nothing else.
Forgotten passwords
Password reset exists, and it is the only way to change a password — there is no “change password” box in the account pages.
On either sign-in page, click Forgot your password?
Enter the email address and send.
The reply is the same sentence whether or not that address has an account. This is deliberate: it stops strangers using the form to find out who has an account here.
Open the emailed link, choose a new password, save.
Choosing a new password from that link also confirms the email address, and signs the account out everywhere else.
Appearance and personal settings
Light and dark mode. The switch is the small sun and moon control at the top right of the dashboard header. The choice is remembered in that browser and applies to the whole site — dashboard and shop — until it is changed. Keyboard: Ctrl+Shift+D, or Cmd+Shift+D on a Mac.
Quick jump. The dashboard header has a Search… box marked ⌘K. Press Ctrl+K anywhere in the dashboard, type a page name, press Enter.
Plate 03The dashboard header, top right: the light and dark switch, and the search box marked ⌘K.Seen as: Administrator
Your profile is in the left menu under Account → Profile. It is read-only there; Edit on the storefront opens the page where it can be changed.
Name can be changed. It is what sellers see on your orders and what appears on your reviews.
Email is shown but cannot be changed — it is what you sign in with.
Profile photo cannot be uploaded. Accounts without one show their initials.
Password is changed through the reset flow above.
The account menu on the shop holds My account, My orders and Wishlist, and — for sellers and administrators — a link into the dashboard which opens in a new tab, so a half-filled basket is not lost. There is also a link to this manual in the storefront footer.
Seller
Applying, getting approved, listing products, working orders, and what you are paid.
Applying to sell
Have these ready before you start
The form asks for company details and there is no partial save.
Your registered business name, as it appears on your papers
Your business registration or CR number
Your tax or VAT number, if your country issues one
Your registered business address
The name and phone number of the person we should speak to
A short description of what you sell, and a contact email and phone for shoppers
Create a shopper account from Sign in → Create an account, and click the link in the confirmation email.
Sign in, click the round avatar at the top right, choose My account, then Become a seller.
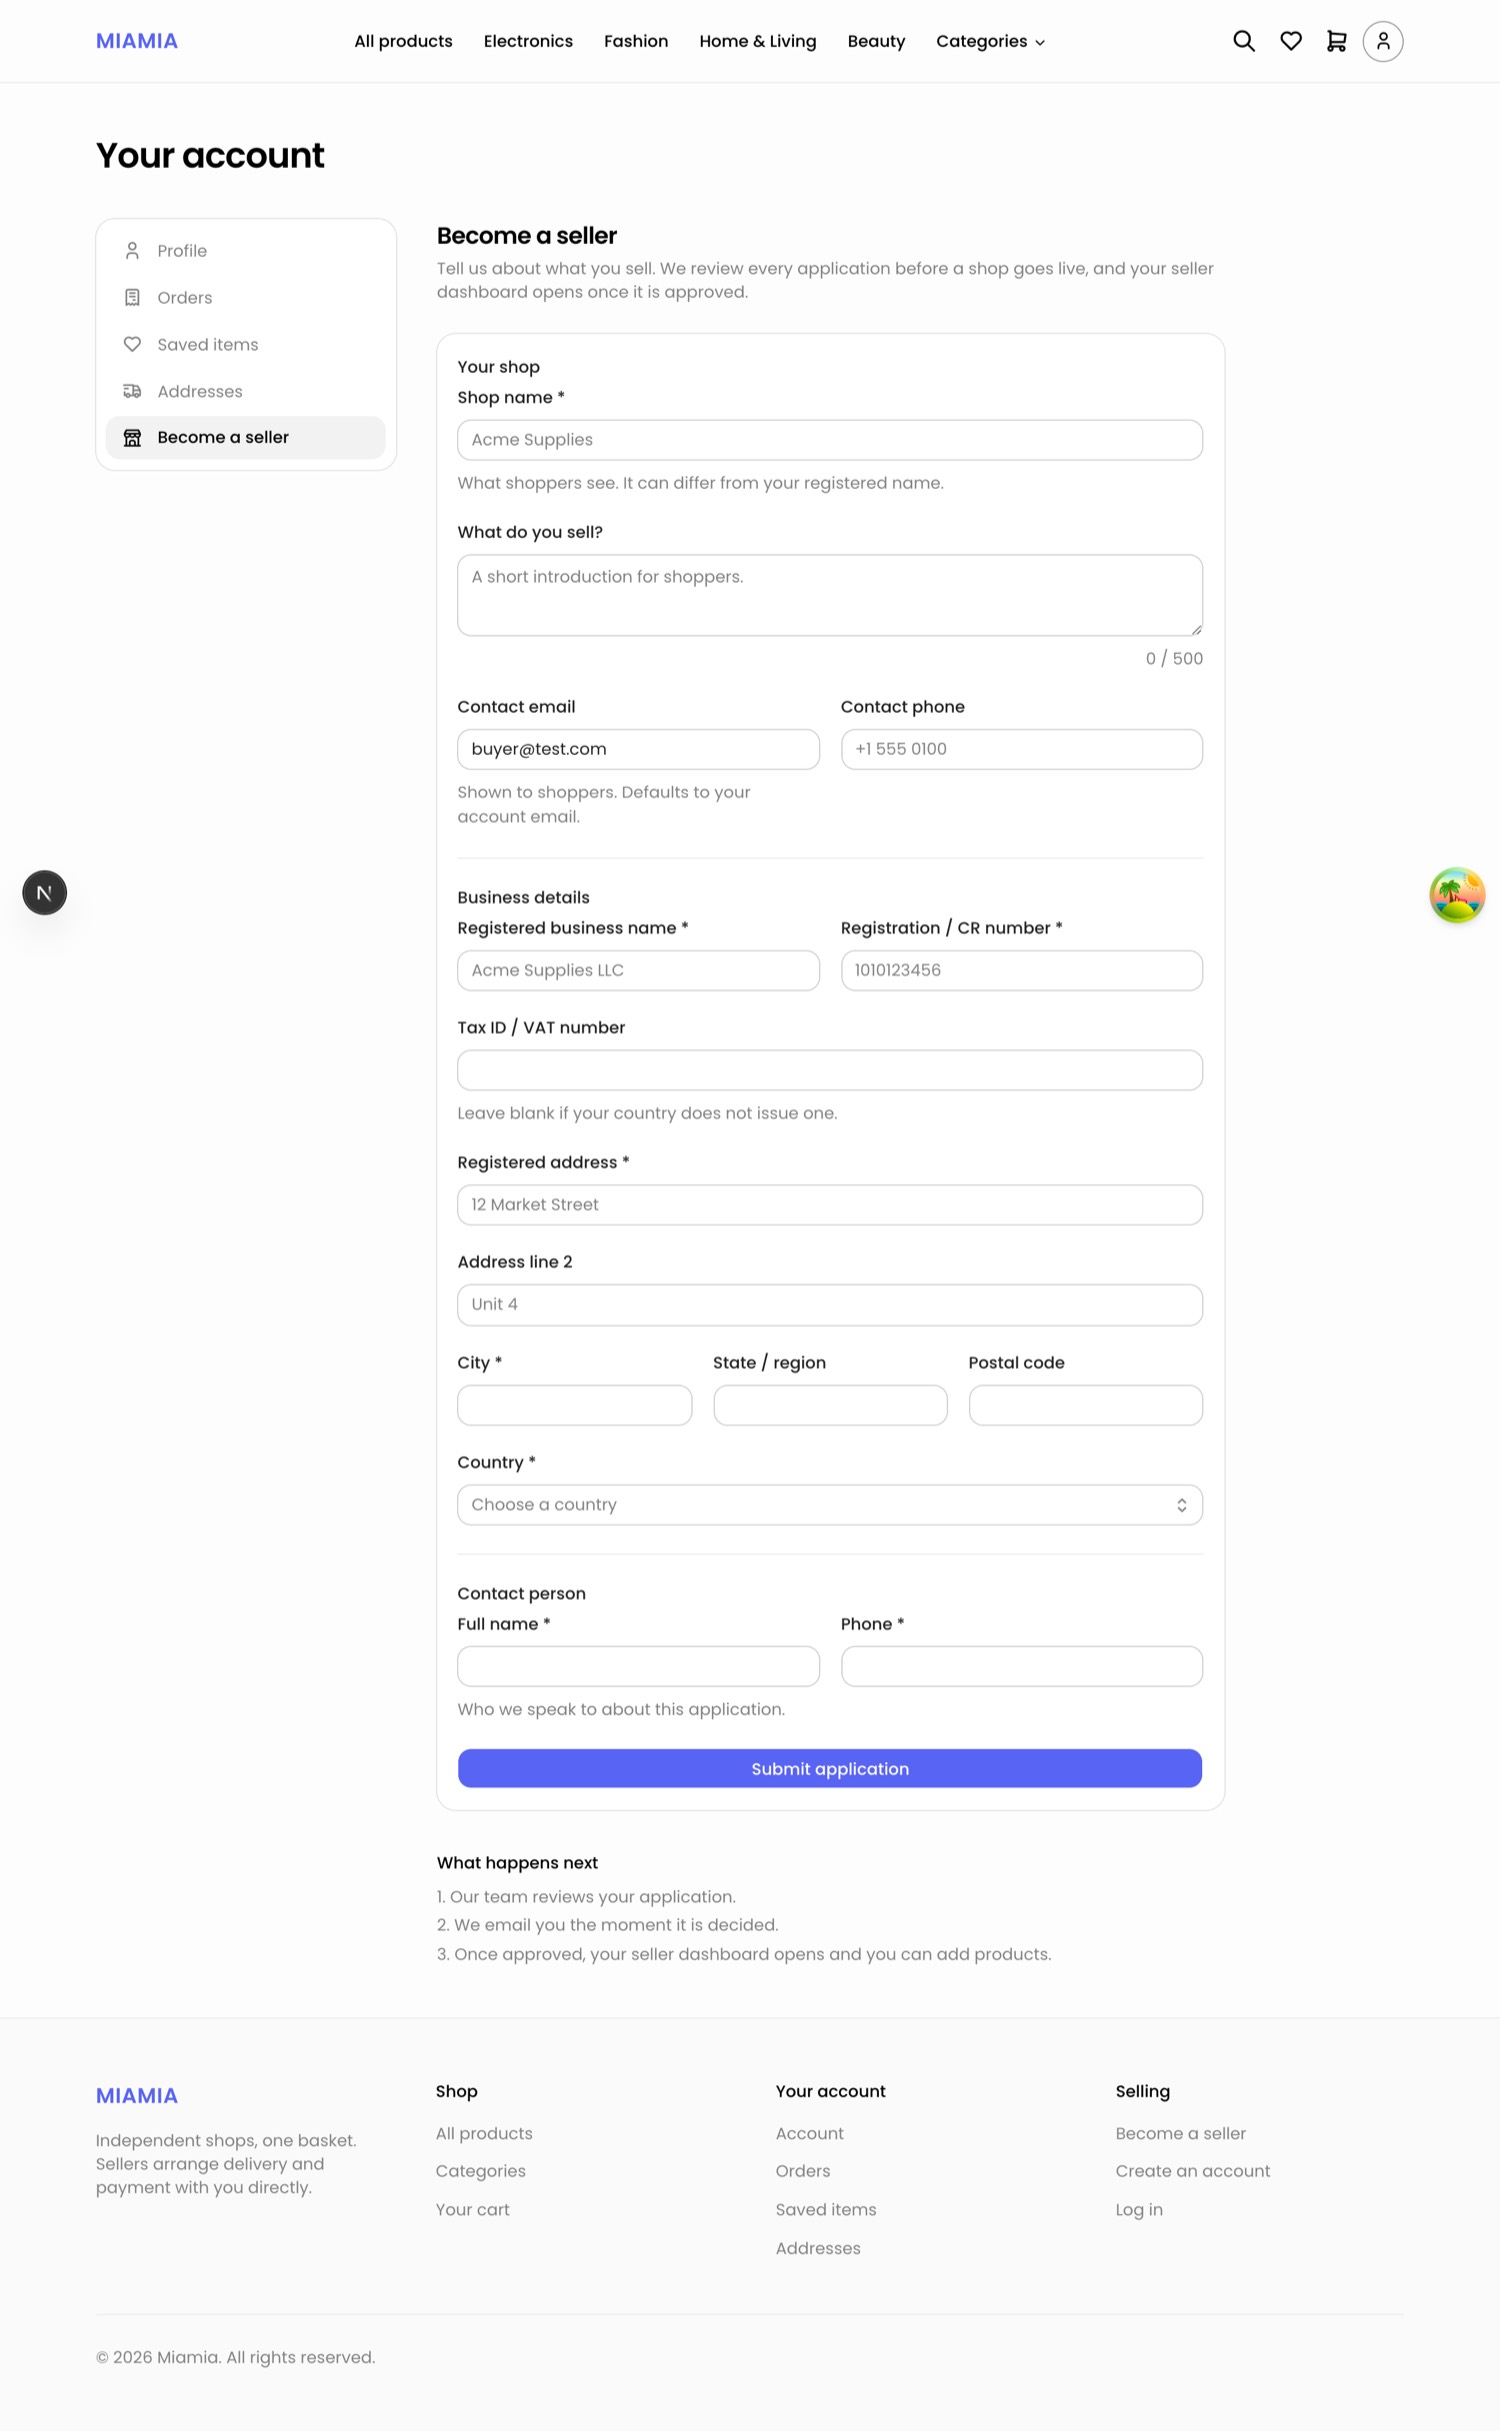
Fill in the three sections — Your shop, Business details, Contact person — and submit.
Shop name is what shoppers see and can be anything. Registered business name must match your papers. The short web address for your shop is created for you from the shop name, and you can change it later in Shop settings.
Plate 16The Become a seller application, showing all three sections.Seen as: Shopper with no shop
Uploading your business documents
Documents are attached after the application is submitted, on the same page.
Go to My account → Your shop.
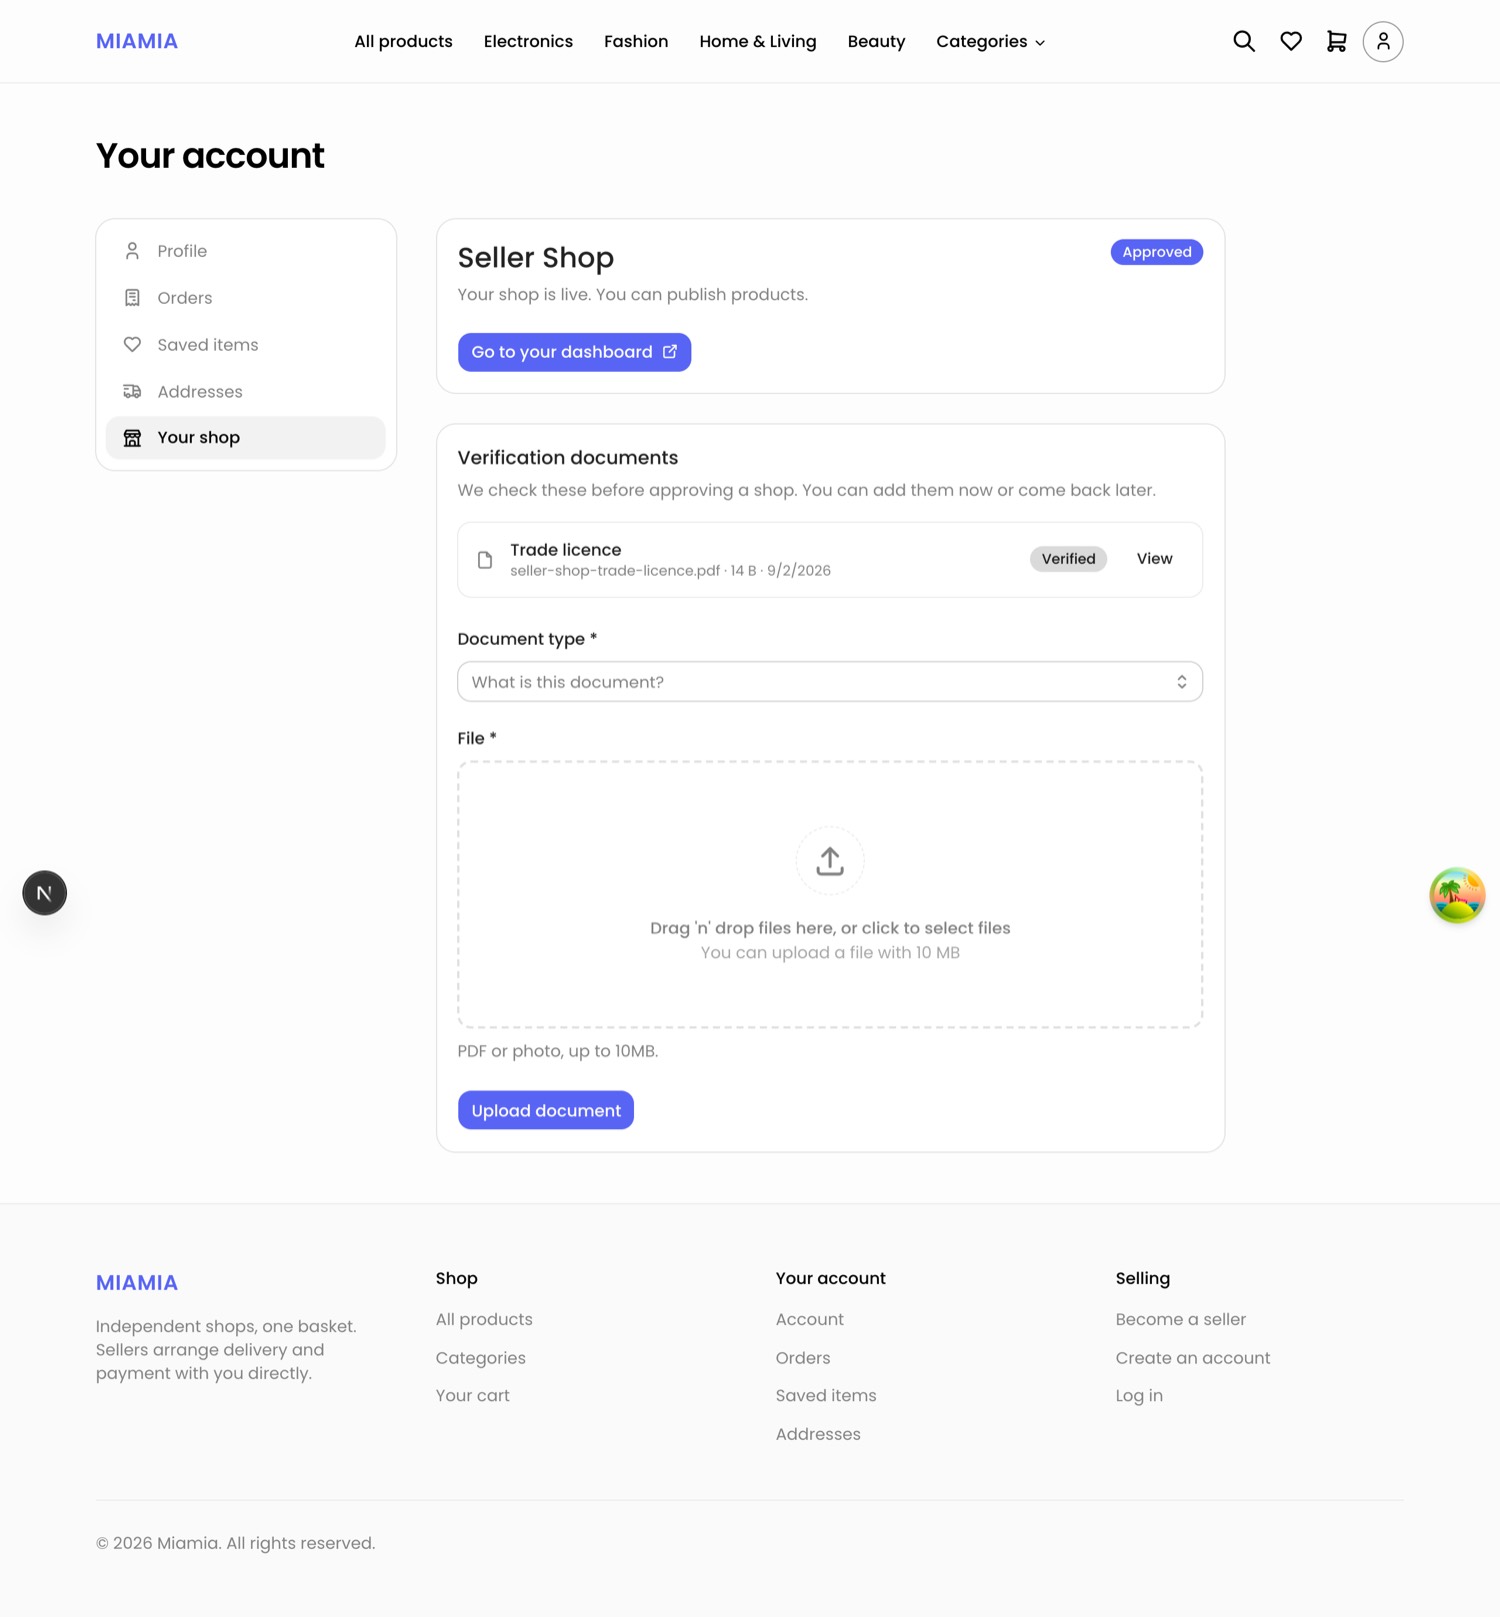
In the Verification documents card, choose the Document type. The list is maintained by the marketplace team — typically trade licence, registration or CR certificate, tax certificate, owner ID, or other — so what you see may differ from the examples here, and may change as the paperwork expected in your country does.
Choose the file, then click Upload document.
Repeat for each paper.
Rule
Limit
Accepted files
PDF, JPEG, PNG or WebP. A clear photograph of a paper document is fine.
Size
Up to 10 MB each
How many
Up to 8 documents in total
Each row reads Awaiting check until the marketplace team reviews it, then Verified. View opens a document so you can confirm you attached the right one — that link expires after a few minutes, which is normal; click View again. The bin removes a document, but once a document has been verified it can no longer be removed, because the marketplace has recorded a decision about it.
Plate 17The seller’s own Verification documents card: one verified trade licence, and the upload form beneath it.Seen as: Seller
“Awaiting review” — what happens next
After you apply, your shop sits at Pending review. That means:
The marketplace team has your application and your documents.
Your seller dashboard is not open yet. Signing in at the Administration page shows your shop name, its status and an explanation — that is not an error.
You can still use the marketplace as a shopper.
The team reviews your application and documents.
You are emailed the moment it is decided.
If approved, your dashboard opens straight away and you can add products.
If your application is not approved, the email explains; reply to it to discuss. Once approved, get in from My account → Your shop → Go to your dashboard, or sign in directly at the Administration page.
Your dashboard
Page
What it holds
Dashboard
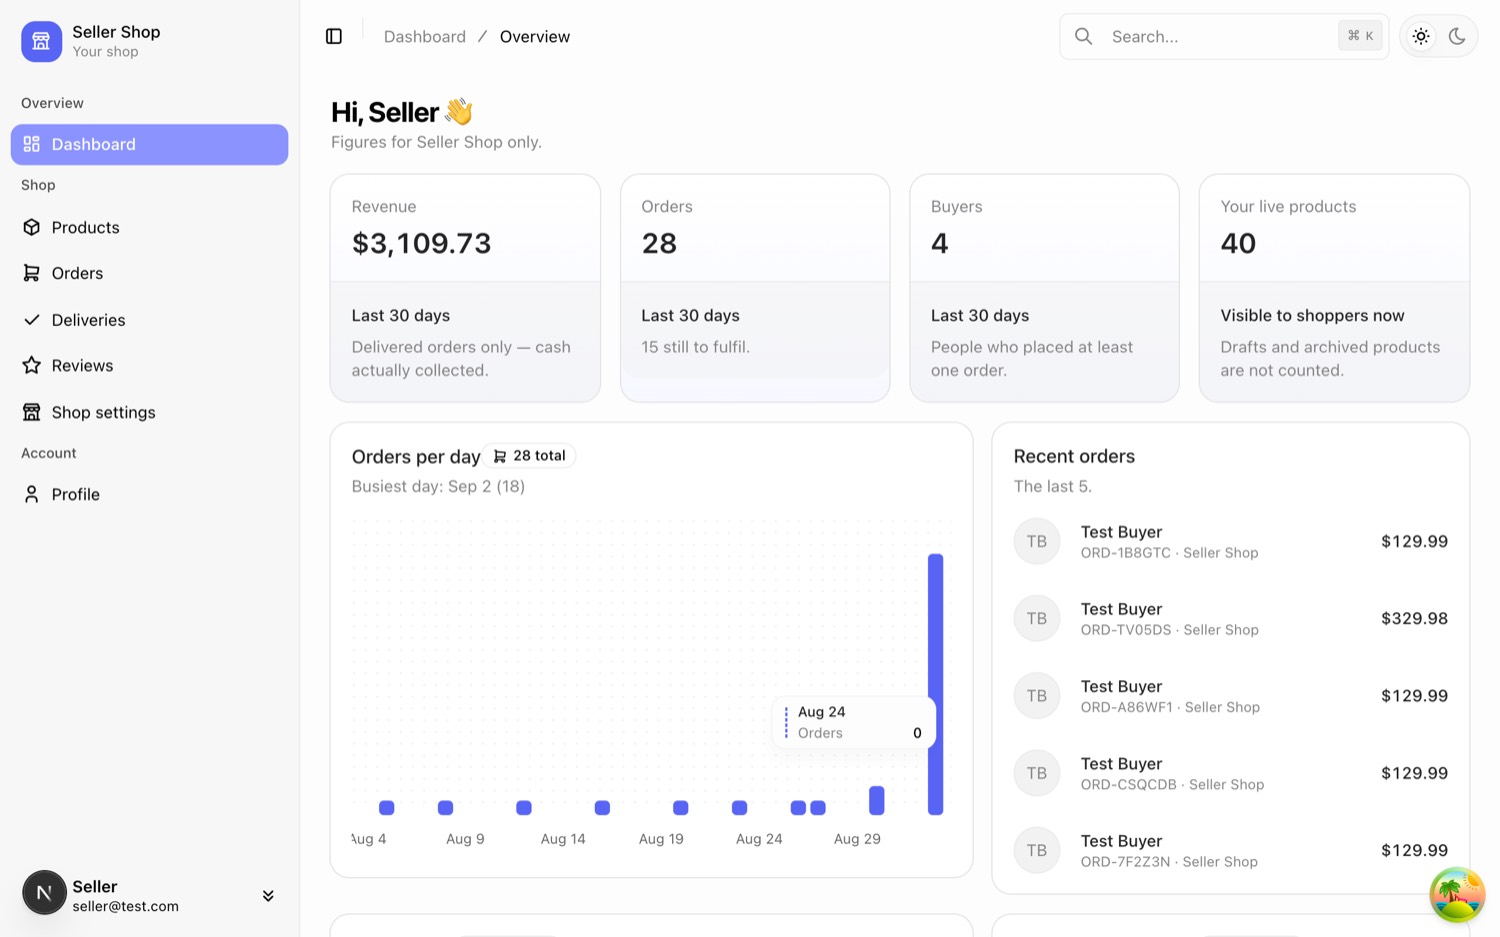
Your figures: revenue, orders, buyers, live products, charts, recent orders. Revenue counts delivered orders only.
Products
Everything you sell.
Orders
Orders that still need you.
Deliveries
Finished orders, delivered or cancelled. A record; nothing to do here.
Reviews
What buyers said about your products.
Shop settings
How your shop appears, and your business details.
Profile
Your own name and email.
Your name sits at the bottom of the menu — click it for Profile and Sign out. The light and dark switch is at the top right of the page.
Plate 18The seller dashboard: revenue, orders, buyers and live products, with the sidebar beside them.Seen as: Approved seller
Shop settings
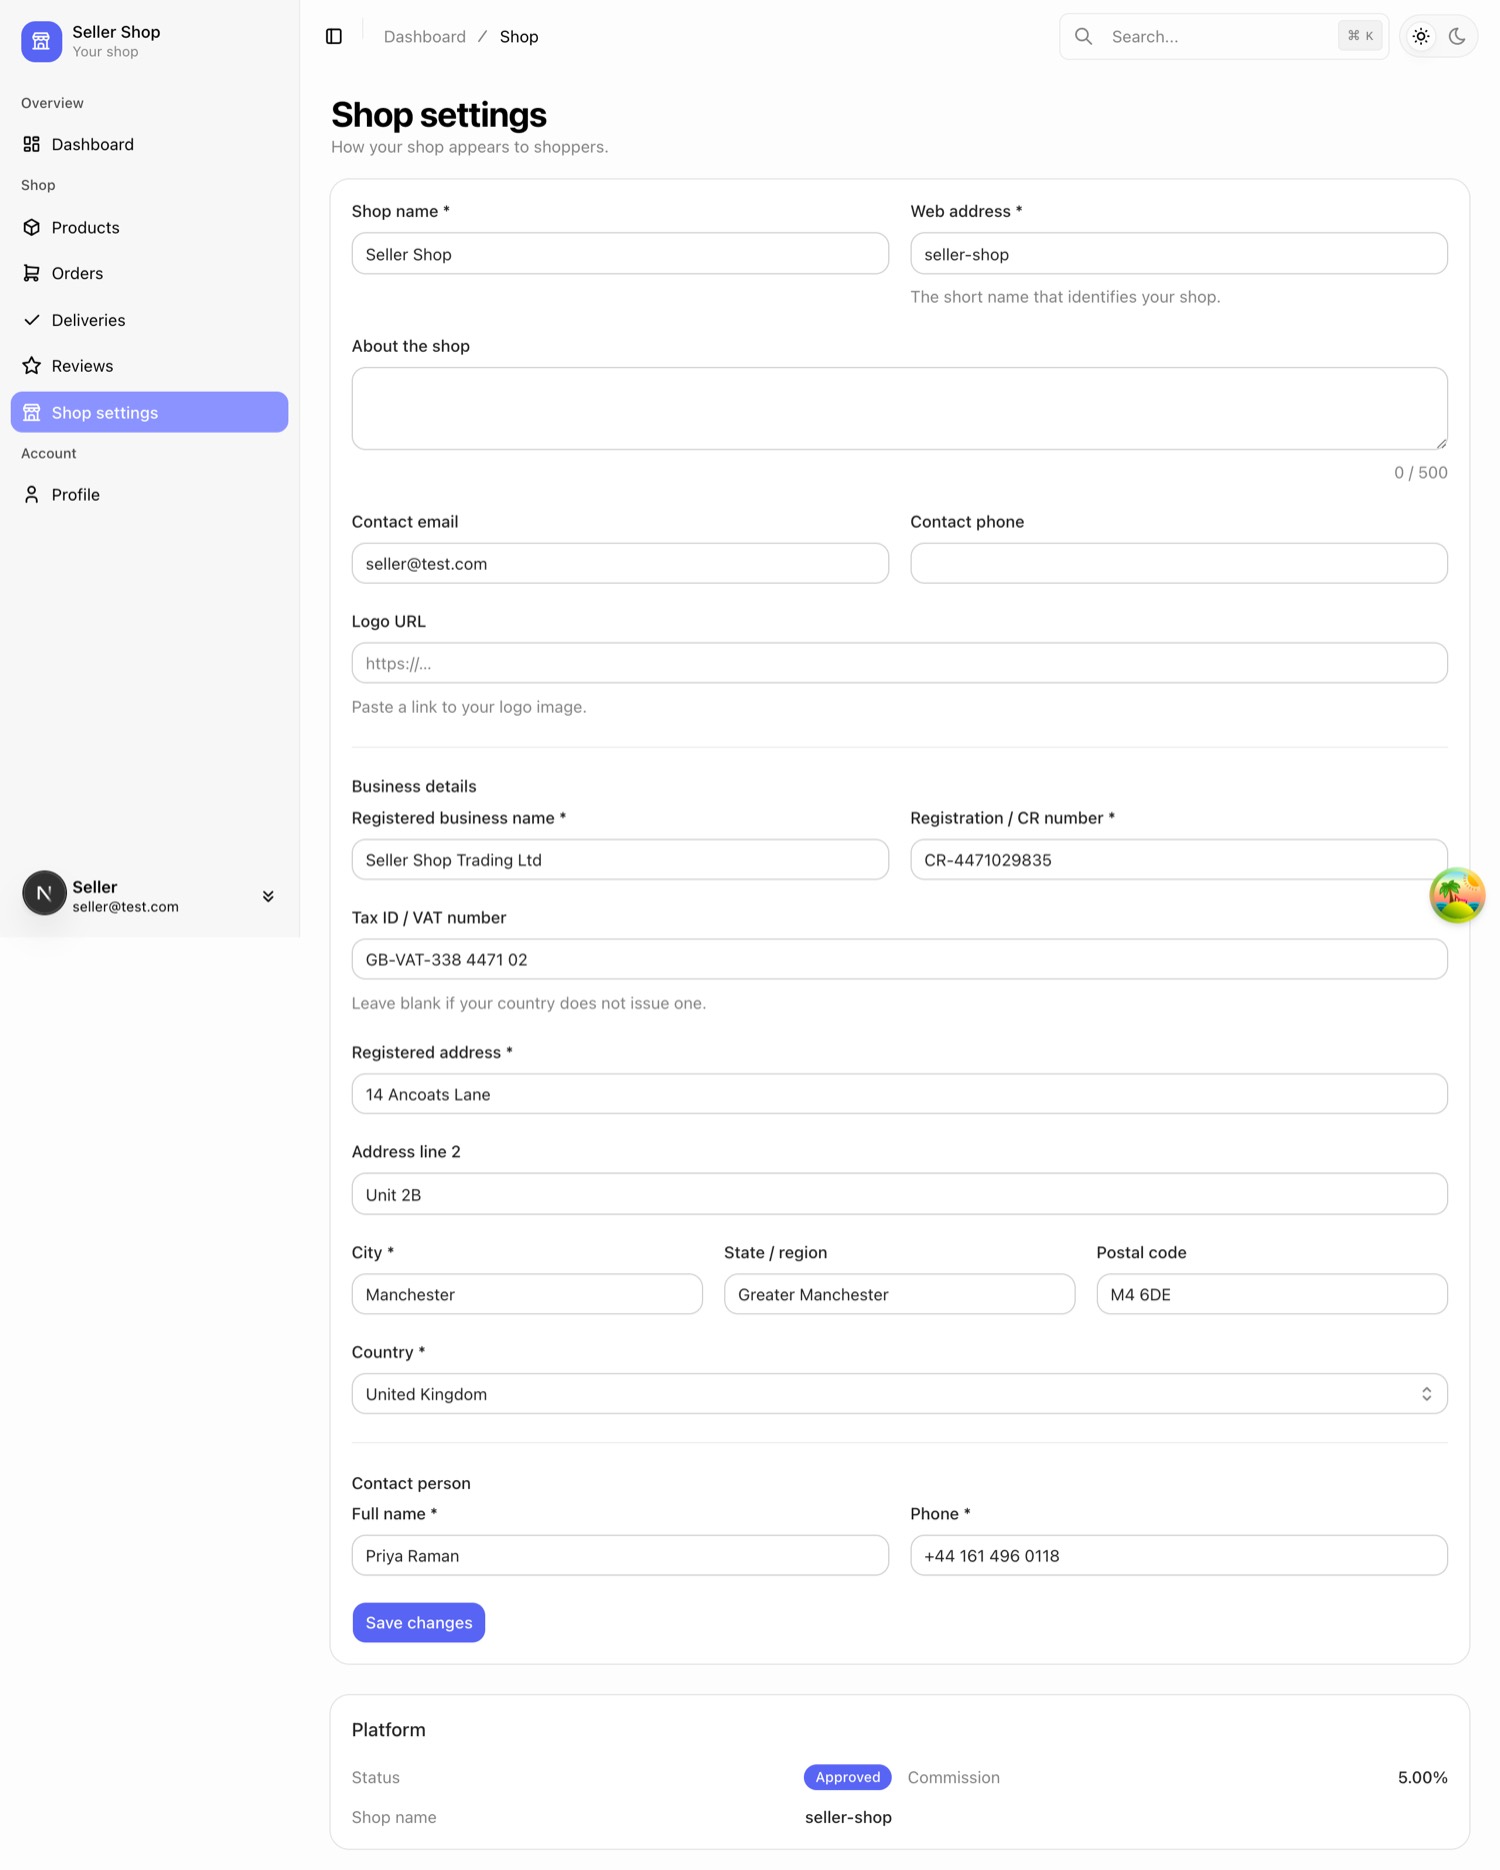
How your shop appears — shop name, web address, description, contact email, contact phone, logo image link. Change these freely.
Business details — registered business name, registration or CR number, tax number, registered address, contact person and phone.
Important
Changing anything in Business details means your identity has to be checked again. Saving one of those fields removes your “verified” mark until the marketplace team re-checks your papers, and the confirmation message says so. Changing your description, logo, shop name, contact email or phone does not — those are cosmetic and leave your verification alone.
So correct a mistyped registration number yourself; you do not need to ask anyone. Just expect to be re-verified. Below the form, a Platform card shows your status, your commission percentage and your shop’s web address. The commission is set by the marketplace and shown for information — sellers cannot change it.
Plate 19Shop settings: how the shop appears, then the Business details whose change retires verification.Seen as: Approved seller
Products
Adding one
Products → Add product.
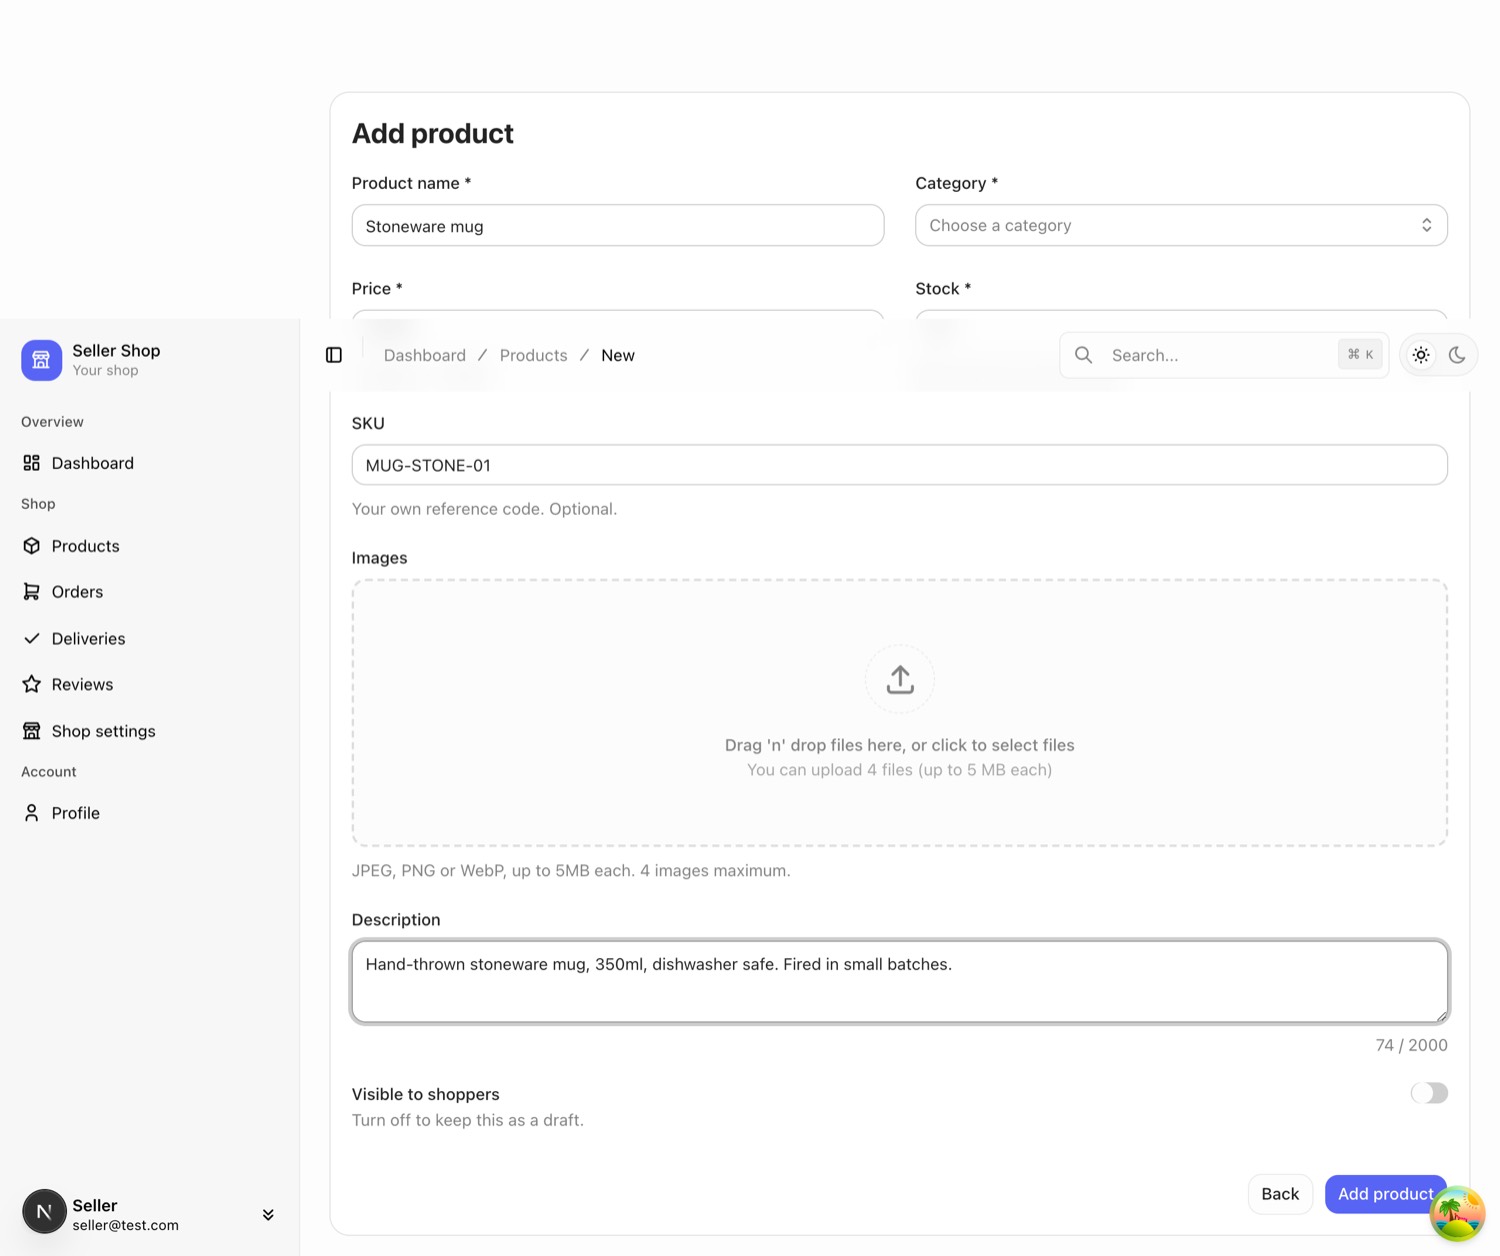
Fill in Product name, Category (required), Price in dollars, Stock, and optionally an SKU — your own reference code.
Add Images: JPEG, PNG or WebP, up to 5 MB each, four maximum. The first is what shoppers see on the product card.
Write a Description — what it is, what it is made of, how big it is. Up to 2000 characters.
Pick whatever applies under Product brand, Product unit, Product size and Product colour. Brand and unit take one answer; size and colour take as many as you like. All optional.
Set Visible to shoppers: off keeps it a draft, on puts it on sale.
Click Add product.
If your shop is not approved yet that switch is replaced by a note: products save as drafts and go live automatically once the shop is approved.
Where those choices come from
Brand, unit, size and colour are lists the marketplace team maintains, not free text — so every shop describes a large blue shirt the same way, and shoppers can rely on it. What you tick appears under Details on the product page. If a size or colour you need is missing, ask the marketplace team to add it; it becomes selectable straight away, with no update to wait for. You may see extra fields here in future for the same reason.
Plate 21The Add product form with details typed in, down to the “Visible to shoppers” switch at the bottom.Seen as: Approved seller
Editing, drafts and archiving
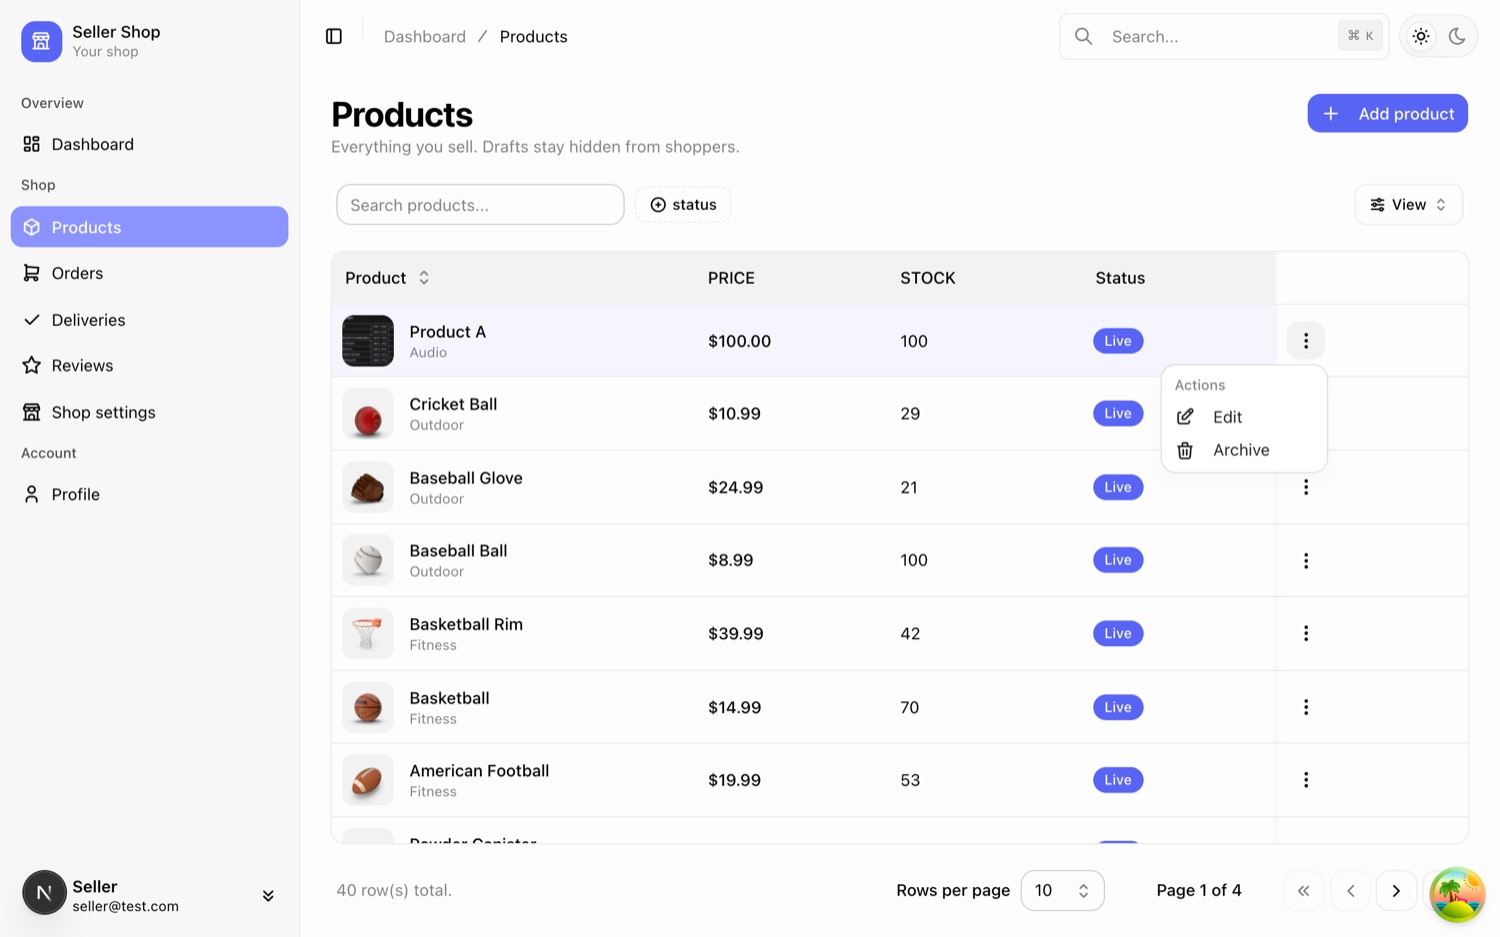
⋯ → Edit opens the same form.
A draft is finished but hidden. Turn Visible to shoppers on when you are ready.
⋯ → Archive takes a product off sale for good. It is not deleted — old orders keep their records — and Restore as draft brings it back.
Stock counts down as orders are placed. At zero the product shows as sold out. Cancelling an order does not put stock back — only you can judge whether those goods are still saleable, so raise the number yourself when they are.
Plate 20The seller’s Products list with a row’s ⋯ menu open on Edit and Archive.Seen as: Approved seller
Orders
Orders is your worklist — everything still needing you, oldest first, because the one waiting longest is the one to do next. Deliveries is the finished history.
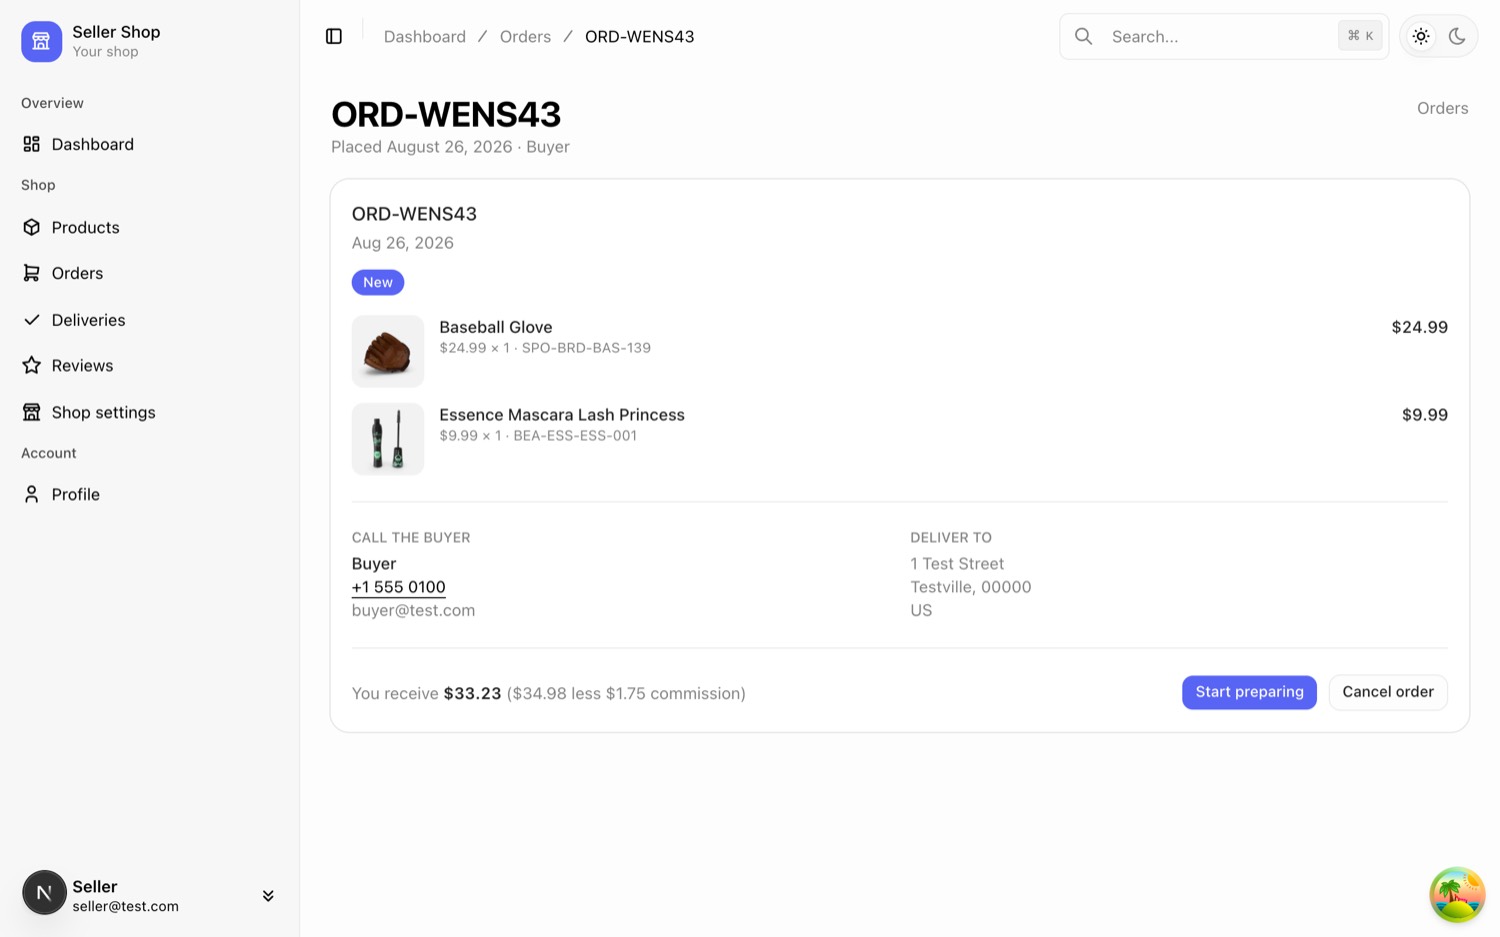
Click an order to open it. You get the buyer’s name, phone number as a link to call, email and delivery address, every item, and the buttons for the next step. You only ever see your own part of an order.
Stage
What it means
What you do
New
The order has just been placed.
Ring the buyer, confirm what they want and when you can deliver. Then Start preparing.
Preparing
You have accepted it and are getting it ready.
Pack it. When it leaves you, Mark as sent.
On the way
It is with the buyer or on its way.
When the buyer has it and has paid you, Mark as delivered.
Delivered
Finished. It moves to Deliveries.
Nothing. This unlocks the buyer’s right to review, and is what commission is calculated on.
Cancelled
The order will not happen.
Nothing. It moves to Deliveries.
Cancelling
You can cancel an order that is New or Preparing. You cannot cancel one already marked as sent — contact the marketplace team if something has gone wrong in transit. Cancelling asks for a reason, and the buyer reads it. It does not return units to your stock.
Mark as delivered only when it really is delivered. It is the moment the buyer can review the product and the moment commission becomes payable.
Plate 22A new order: the buyer’s phone number as a link to call, their address, the items, and the next step.Seen as: Approved seller
Reviews of your products
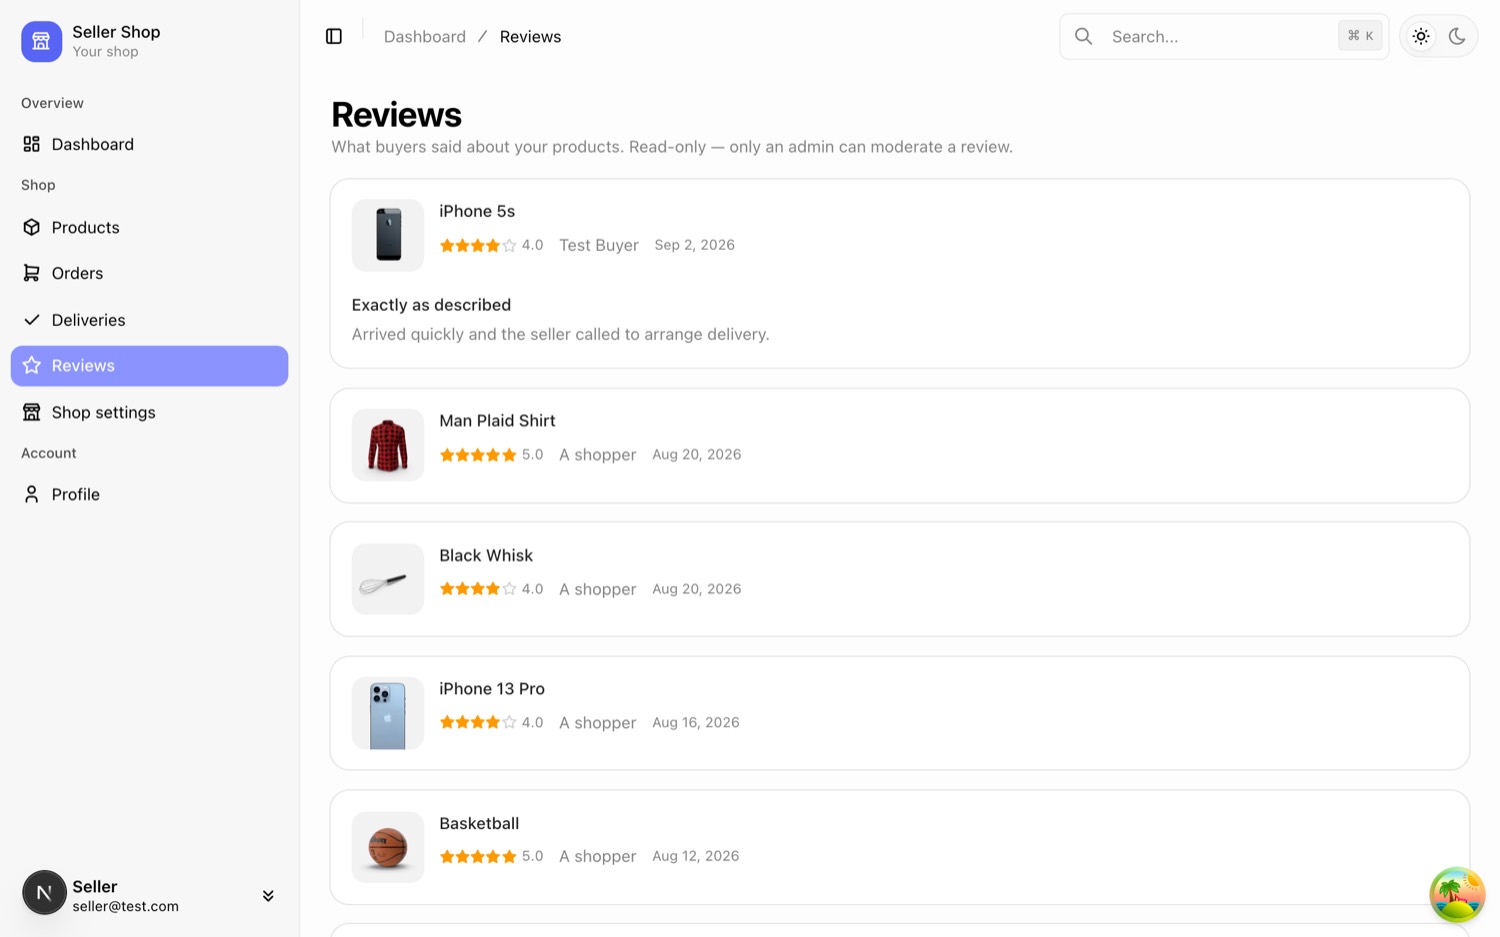
Reviews shows every review of your products: the stars, the headline, the text, who wrote it and which product.
The page is read-only, deliberately. You cannot hide, edit or delete a review of your own product. If sellers could remove their bad reviews, no shopper would trust the good ones — and since only a buyer whose order was actually delivered can write one, every review here came from a real customer of yours.
If a review is abusive, or is about something other than the product, contact the marketplace team. An administrator can hide it, and hiding removes it from your product’s average immediately. Reviews start appearing after your first deliveries.
Plate 23The seller’s Reviews page. Read-only — there are no controls on a review.Seen as: Approved seller
What you will be paid
Nothing is charged online. You collect the full amount from the buyer, in cash, when you deliver. Miamia then charges you a commission on what you delivered, which you settle with the marketplace separately.
On an order
Means
Subtotal
What the buyer pays you for your items.
Commission
The marketplace’s share, with the percentage shown.
You receive
Subtotal minus commission — what the order is actually worth to you.
Your percentage is on Shop settings, in the Platform card. Three things worth knowing:
The rate is fixed when an order is placed. If the marketplace changes its rate later, your old orders keep the rate they were taken at.
Commission is only owed on delivered orders. Cancelled orders owe nothing; orders in progress owe nothing yet.
“You receive” is not a payment you are waiting for. You already have the money — you took it at the door. It is what you keep after the marketplace’s share.
The marketplace team will contact you to collect commission, and records each settlement against your shop.
Shopper
The buying flow, end to end — and what a customer sees when they telephone.
Browsing, searching and the cart
All products shows everything on sale, with filters for sort order, category and shop. Chips beneath show what is filtered; click the × on one to clear it.
Categories in the header browses by department, and the magnifying glass opens a search box.
A product page shows photos, price, stock, the shop selling it, its star rating and its reviews.
The heart saves a product to the wishlist. Signed-out visitors are asked to sign in.
The cart icon holds everything added. Signed-out visitors get a cart too — it lives in their browser and is merged into their account when they sign in. On the cart page items are grouped by shop, with a subtotal for each.
Checkout, and what happens about payment
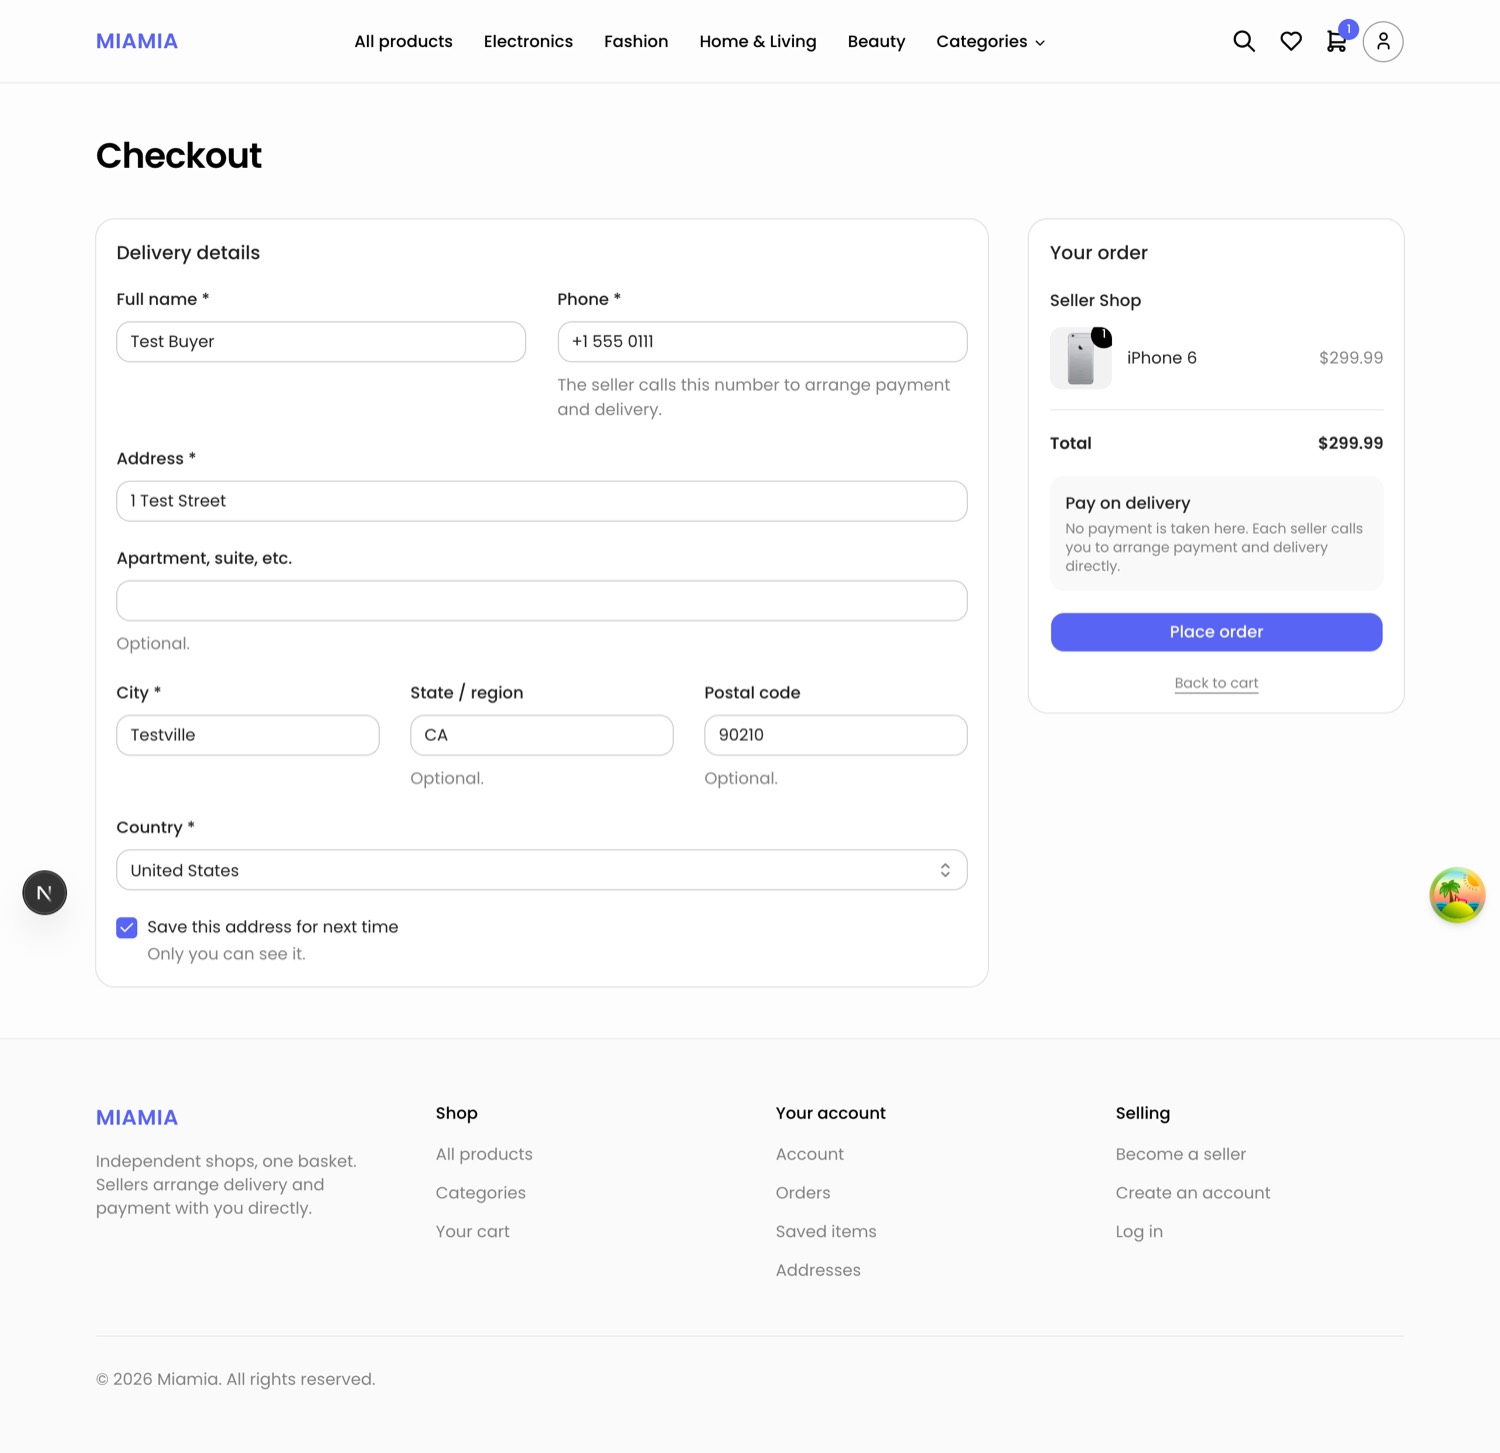
Checkout asks for delivery details: full name, phone, address, city, optional region and postal code, country, and a tick box to save the address. A saved address fills the form automatically.
There is no payment step
No card is ever entered. The order summary says so plainly: “Pay on delivery — no payment is taken here. Each seller calls you to arrange payment and delivery directly.”
Clicking Place order:
Re-checks every item is still available and in stock. If something sold out meanwhile, nothing is ordered and the shopper is told which item.
Reserves the stock and creates the order, split by shop.
Empties the cart.
Shows the confirmation with the order number.
Emails the shopper a confirmation, and emails each seller their new order.
Plate 24Checkout: delivery details on the left, and on the right the order summary with the Pay on delivery note.Seen as: Shopper
When the basket holds items from more than one seller
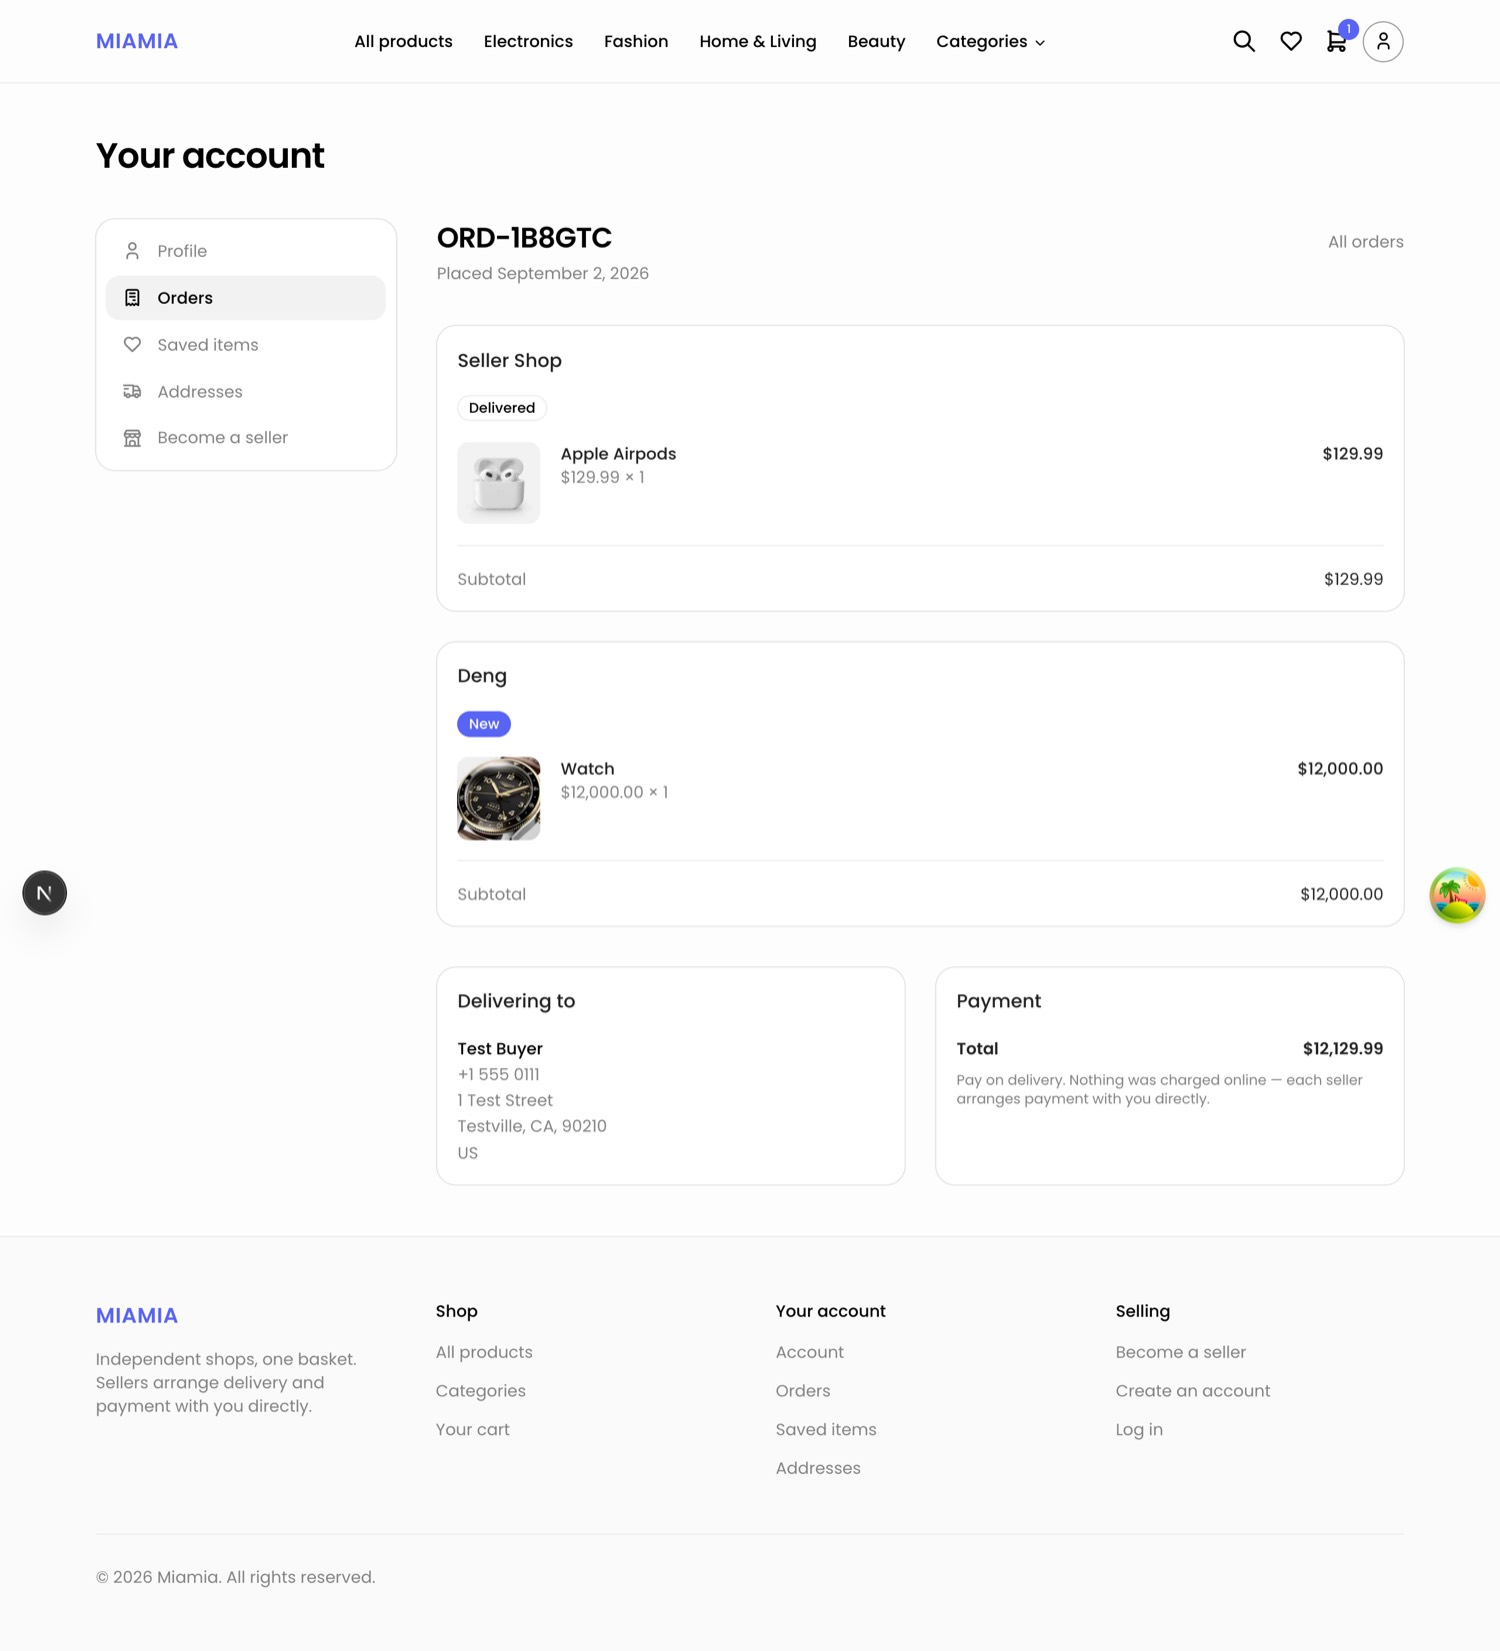
At checkout the order splits into one part per shop. The shopper still gets one order number and one total, but from then on each shop handles its own part alone: its own status, its own phone call, its own delivery. So an order can genuinely be half delivered and half not. Nothing has gone wrong.
Tracking orders, wishlist and addresses
From the account menu, My orders. Each order shows its number, date, total, and a status chip for each state its parts are in. Opening one shows a card per shop, the delivery address, and the total with the reminder that nothing was charged online. A cancelled part shows the seller’s reason.
The stages a shopper sees are New, Preparing, On the way, Delivered and Cancelled.
Wishlist holds anything hearted. If a saved product is no longer on sale it drops out, and a line at the bottom says how many are hidden and why.
Addresses stores up to 10 delivery addresses, with a default that fills in at checkout. The first one saved becomes the default; deleting the default promotes another.
Plate 25A shopper’s order split across two shops, each card carrying its own status.Seen as: Shopper
Writing, editing and deleting a review
On the product page, under the reviews, one of three things appears:
Signed out — a prompt to sign in.
Signed in with no delivered order for that product — “Reviews come from buyers. Once an order containing this product is delivered, you can review it here.”
Signed in with a delivered order — the review form.
Why the option only appears after delivery
Since no payment passes through the site, a completed delivery is the strongest proof that somebody really bought the thing. Requiring it is what keeps the ratings honest — and it is why a shopper cannot review a product they never received, including one they ordered but which was cancelled.
To write one: click the stars for a rating (required), optionally add a headline and some text, then Post review. Returning to the same product shows the review already filled in, with Update review and Delete review. Editing replaces it — one person leaves one review per product; they do not stack. If an administrator has hidden a review, rewriting it does not bring it back.
Reference
The questions that come up most, and what the words mean.
Common questions
I can’t sign in.
Three usual causes. One: the email was never confirmed — the message says so, and Send a new link is on that same screen. Two: wrong page — shoppers sign in on the shop, sellers and administrators at the Administration page. Three: the shop is not approved — a seller whose shop is pending, rejected or suspended can sign in, but sees their shop’s status instead of a dashboard. That is not a broken password.
Why can’t I review this product?
Only someone whose order containing that product was marked delivered can review it. If the order is still New, Preparing or On the way, the option appears once the seller marks it delivered. If it was cancelled, the right does not apply.
My order is half delivered.
Expected when the basket held items from more than one shop: the order split at checkout and each shop works its own part, at its own pace.
Where do I change my password?
There is no password box in the account pages. Use Forgot your password? on either sign-in page and follow the emailed link.
The document link stopped working.
Working as designed. Document links expire after five minutes so a copied link cannot be shared. Open the Documents panel and click View again.
Glossary
Shop
One seller’s storefront on the marketplace. One person, one shop.
Code group
One of the lists the marketplace team maintains — countries, currencies, document types, product sizes and colours. Entries added or retired there change what everyone on the site sees straight away, without an update to the software.
Retired
An entry in a code group that is no longer offered. It is not deleted: orders and addresses that already used it still read correctly, and it can be put back in use.
Seller
The business that owns a shop and fulfils its own orders. Sellers start as shoppers and apply.
Approved
The marketplace has agreed this shop may trade. It opens the seller’s dashboard and lets their products go on sale.
Verified
The marketplace has checked this shop’s identity documents and found them genuine. Separate from Approved, and removed automatically if the seller edits their registered business details.
Suspended
A shop switched off: hidden from shoppers, dashboard closed. Reversible.
Commission
The marketplace’s percentage of each delivered order. Fixed when an order is placed, so later rate changes never rewrite old orders.
Owed
Commission on delivered orders that has not been settled yet. A balance, so it falls when a settlement is recorded.
Payout
The record of settling up with one seller: which delivered orders it covers and how much commission they carry. Raised first, marked paid when the money arrives.
Settled
Commission actually received, recorded by marking a payout paid. Each order is settled once and only once.
Delivered
The seller has handed the goods over and been paid. It unlocks the buyer’s review and makes the commission payable.
Still stuck
Anything this manual does not answer goes to the marketplace team. Sellers: reply to any email the marketplace has sent you, or use the contact address on your Shop settings page.